Hosting Without an IP: Tunnels
Finally, another technical post!

Every sysadmin's done it before.
Whether it was initially for a web service or a video game, everyone's looked up how to port forward and host a service. The infamous format of four numbers separated by periods has become synonymous with servers over the past several decades. IPv4 is one of the foundations upon which nearly every tech-savvy user builds their concepts of networking. In order to host anything, you need an IP... Right?
We now live in an era where nearly everything's connected to the internet in some form, and the initially boundless 4.3 billion available IPv4 addresses are slowly becoming harder and harder to get. Nowadays, many ISPs charge a monthly fee for having a static IP. Cloud providers like Amazon Web Services are beginning to follow suit, having terminated their one free public IP policy as of this month and they've now begun charging accounts an hourly rate for each IPV4 address they have. The era of IPv4 is ending, so how are homelabbers expected to host stuff anymore?
Sure, there's IPv6, which has orders of magnitude more addresses than v4. (Around 340 undecillion.) However, having to redesign an entire network to handle both IPv4 and IPv6, then perpetually managing the security policies for both, is a bit of a headache that many sysadmins— myself included— don't want to undertake at the moment. Make no mistake, IPv6 is the proper solution for the long-term. But for the intermediary period, a new challenger enters the ring: Network Tunneling.
The main premise of this post ended up being built on a false assumption. Tunnels are still useful for a wide variety of reasons, but it shouldn't be used as a means of avoiding AWS's IPv4 fees. I talk more about this in the followup to this post, which can be found here. The guide below is still correct and up-to-date.
Network Tunneling
Now, tunneling is not a new concept by any means. Everyone's seen the ads online for the countless VPN services that advertise in nearly every YouTube video or podcast on the internet nowadays. Those tools work by tunneling your device's network traffic to a server located elsewhere before dumping it into the internet. Unfortunately however, most VPNs can't be used to host services. Rather than a tunnel designed for handling outbound traffic, we need one designed for ingress.
Luckily, tunnels for ingress do exist and are becoming a hot topic within IT! The two major players in the field of ingress tunneling that I use on occasion are Cloudflare and Ngrok. As of writing, Cloudflare is free to use for HTTP/HTTPS traffic. Ngrok is as well, and has additional support for TCP traffic for a $10 monthly fee, although we'll strictly focus on HTTP in this article.
The way these tunnels work is pretty simple. You configure a daemon to run on your server which connects to your provider's network. Then, assuming you're using a domain to host your service, you should configure your domain's DNS records to point to whatever CNAME value the provider gives you. From then on, any requests sent to that domain are tunneled from your provider's network to the daemon on your server, which can then forward requests to the proper downstream service via localhost.
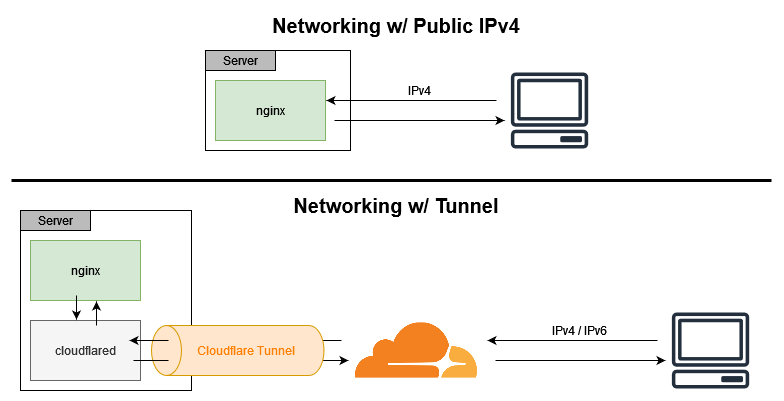
Tunnels are great because it doesn't matter whether your network has a static or dynamic IP, or even if your server can't be port forwarded. Because your server initializes the connection to the tunnel provider rather than the other way around, lots of routing concerns can be tossed out the window.
Usage of tunnels over port forwarding does not eliminate the security risk commonly associated with port forwarding. You are still giving the internet some form of access into your network, so you should still adhere to all of the security guidelines you would follow for any port forwarded device. (i.e. Host on a separate network from personal devices, monitor logs, update software regularly, etc.)
As a means of skirting around the new effective ~$44 annual fee for using a public IP with AWS, Cloudflare tunnels are a godsend.
Setting up a Cloudflare Tunnel
Now let's walk through the steps of setting up an HTTP(S) tunnel using Cloudflare. I'll demonstrate how to use Cloudflare's tunnel daemon in two ways: on a traditional VM and via Docker.
First and foremost, you're going to need two things to start: a free Cloudflare account and a domain you'd like to use for testing. You can sign up for a free Cloudflare account here. You can also buy a domain through Cloudflare Registrar, although I would personally recommend buying from a third-party registrar like Porkbun, then changing the domain's nameservers to point towards Cloudflare. For more documentation on adding a domain to Cloudflare, see these docs.
I'll be using the tunnel.azureagst.cloud domain for the duration of this post.
Cloudflare on a Virtual Machine
Here's a configuration that mirrors a setup commonly found while serving web content using Nginx.
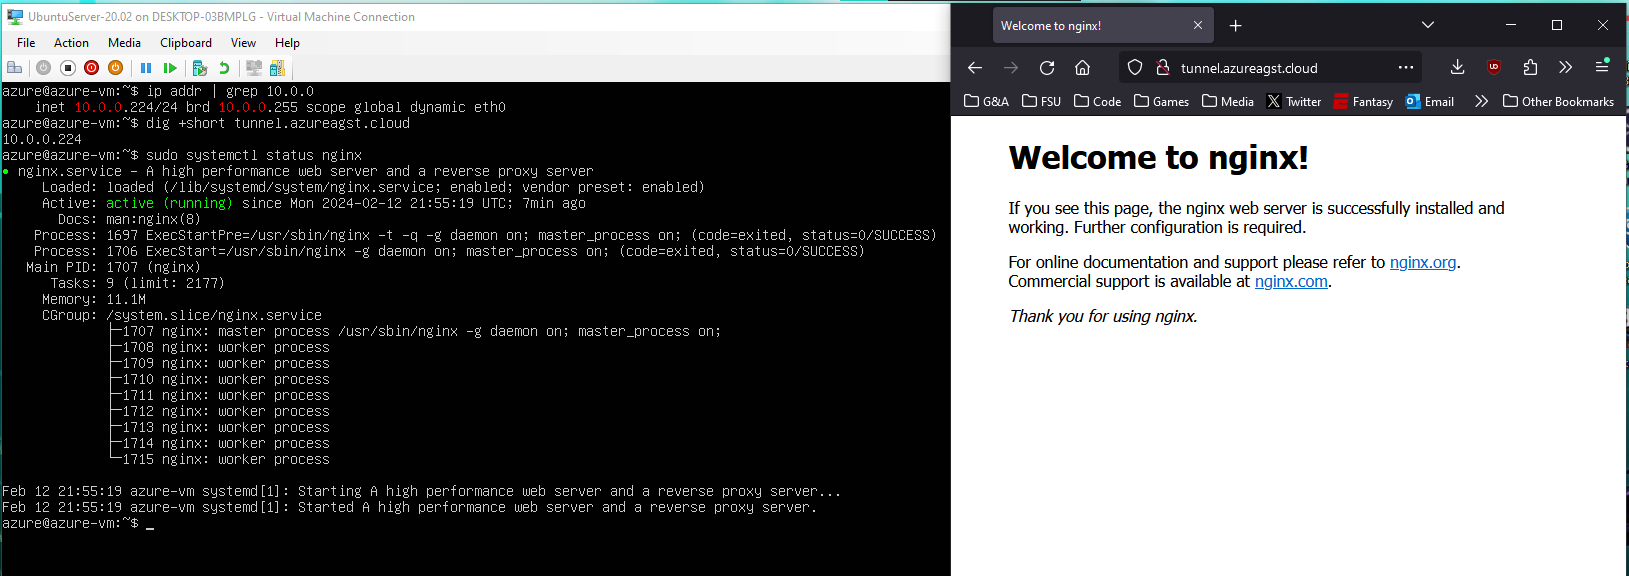
On my computer, I have a Ubuntu Server VM bound to my local network with the IPv4 address: 10.0.0.224. I have also configured tunnel.azureagst.cloud to only have a single A record that points towards the VM's IP address. With this setup, if I paste the domain in my local machine's browser, the default NGINX template loads.
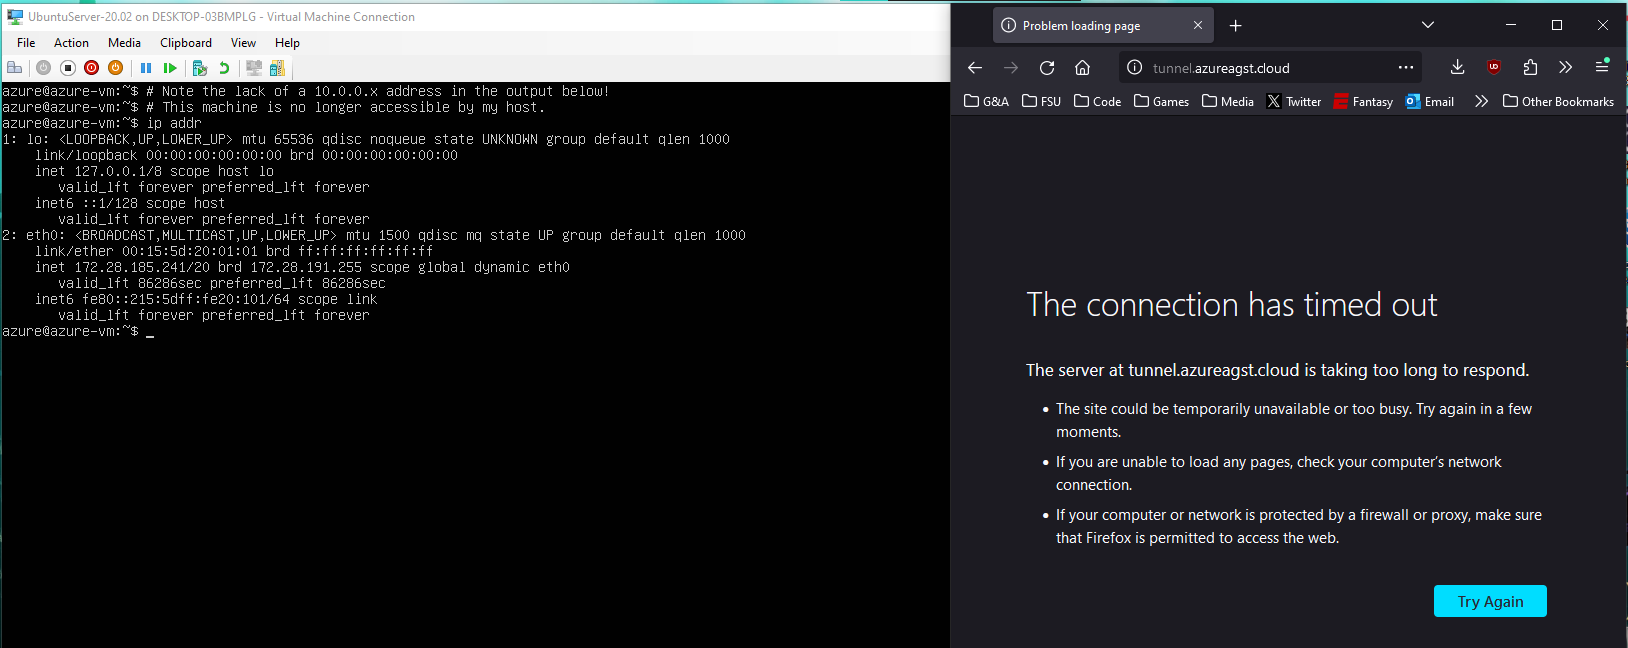
Now, lets change my VM's network adapter to prevent it from binding to my external network, effectively revoking its "Public IP." This action is intended to parallel removing an elastic IP from your EC2 instance in AWS, or removing a port forward from your router if you're self-hosting.
Now, as you can see, my host machine is no longer able to access the Nginx instance running on the VM.
I'll delete the old A record in the domain's DNS dashboard to reflect this change.
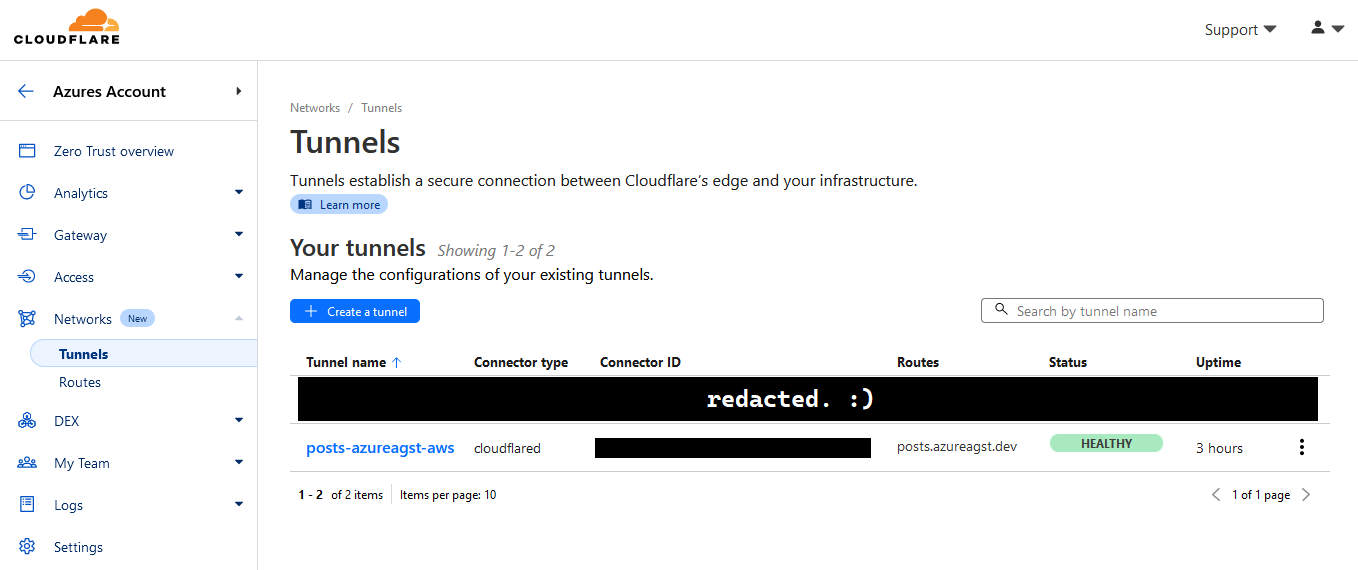
Now, let's configure a tunnel. In the Cloudflare dashboard's sidebar, click on "Zero Trust." Then, in the resulting page's sidebar, toggle the "Networks" dropdown, and click on "Tunnels." You should see a page that looks similar to the following.
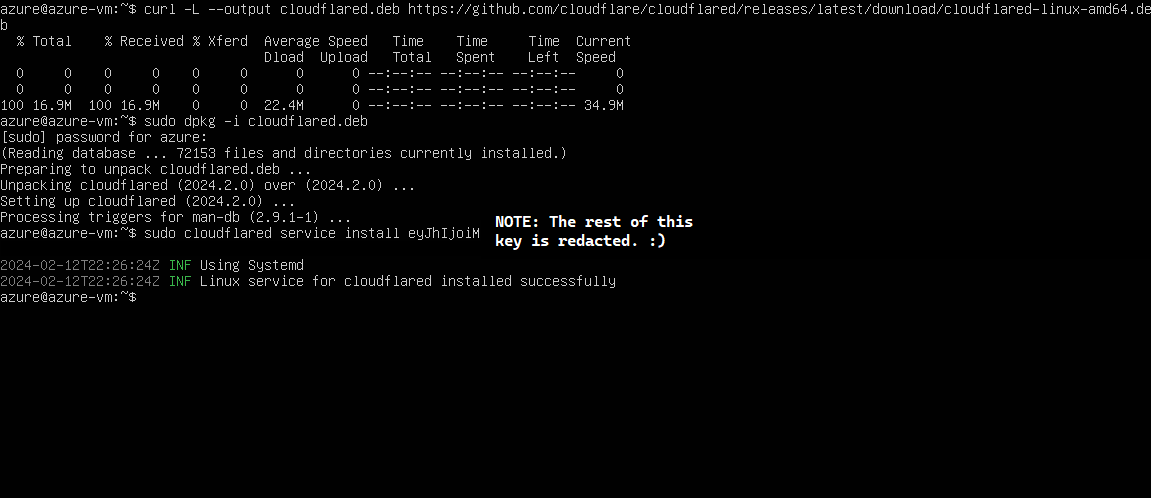
To create a tunnel, click on "Create a tunnel." Select cloudflared as your preferred connector, then name the tunnel something useful. The following page will give you a series of commands you're to run on your server in order to get the tunnel up and running. Simply follow them until you see a message saying "Linux service for cloudflared installed successfully."
Now, if we go back to the Cloudflare tunnel creation page on my host machine, we can see that there's a new connector listed at the bottom of the page, with the status "Connected."

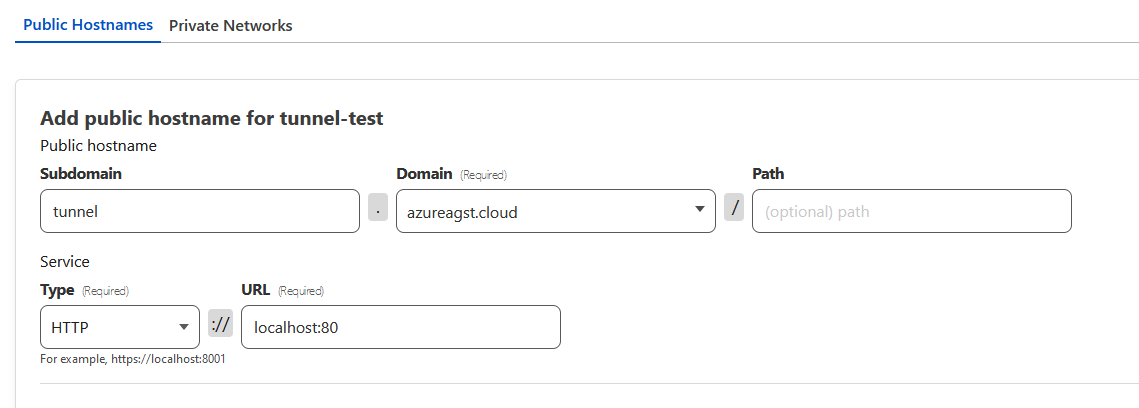
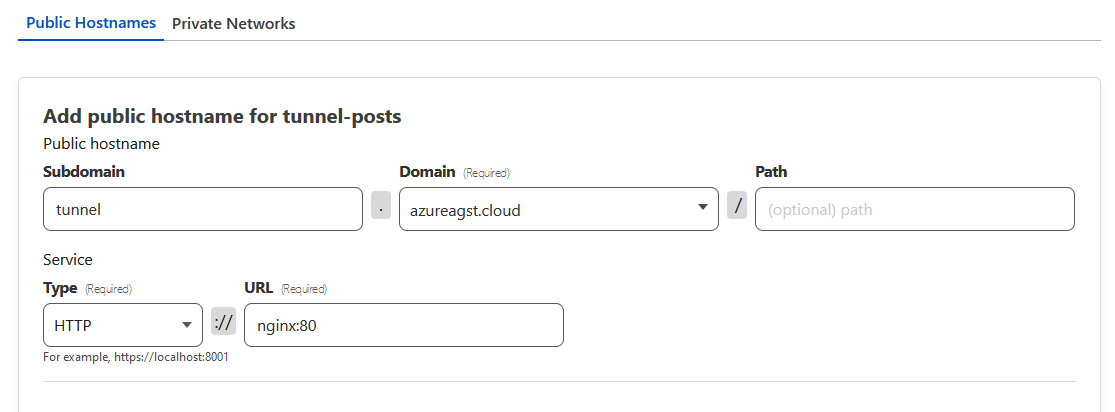
We can click the next button at the bottom of the page to move on to application creation. Now, all we have to do is configure the top half of the section with the public-facing URL that we want our app to be visible at, and put the internal address of the service in the service definition.
Note that the base domain must be selected from a dropdown of the ones you've already registered with Cloudflare. Subdomain and path definitions are optional.
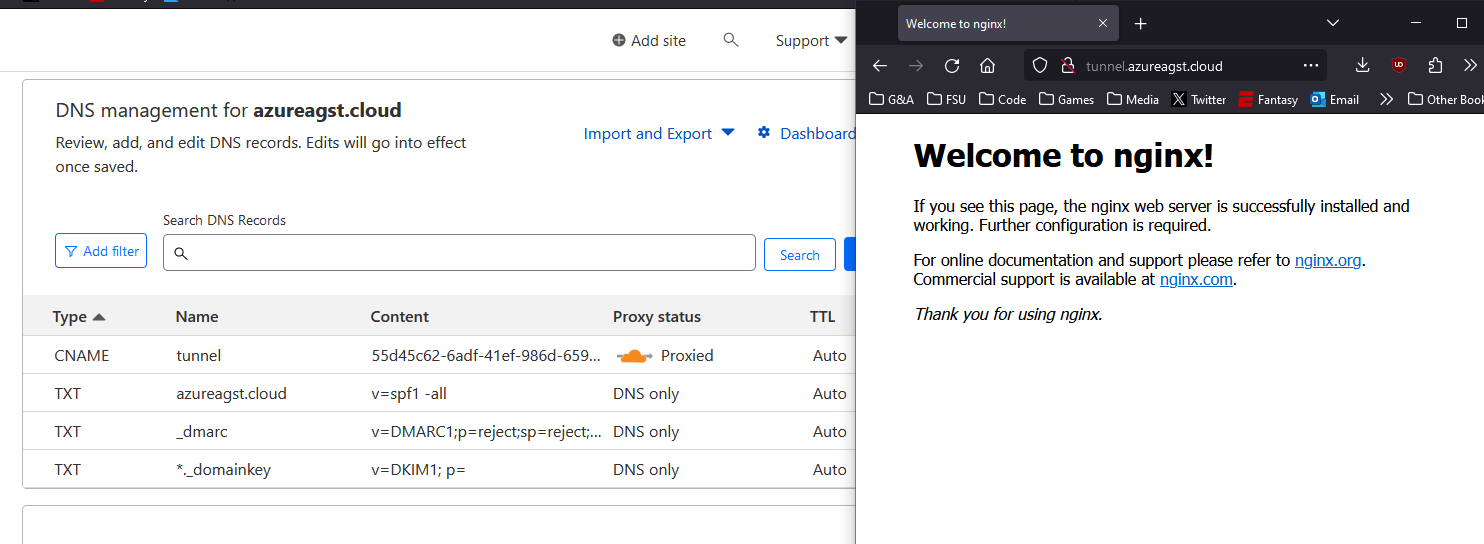
Now, if we click on next one last time, we can see that a new tunnel has been created and our traffic is being served! Behind the scenes, all that Cloudflare did to make this work is add a new CNAME record pointing at a cfargotunnel domain that handles our HTTP(S) tunnel. You can see this change if you look at your DNS dashboard.
Congrats! You're now tunneling your traffic through Cloudflare's global network!
Cloudflare in Docker
For this example, I've undone all of the work that I did for the last example. On my VM, I have set up an identical nginx web server using a pretty simple docker-compose file:
version: "3.8"
services:

  nginx:
    image: nginx
    ports:
      - "80:80"
    environment:
      - NGINX_PORT=80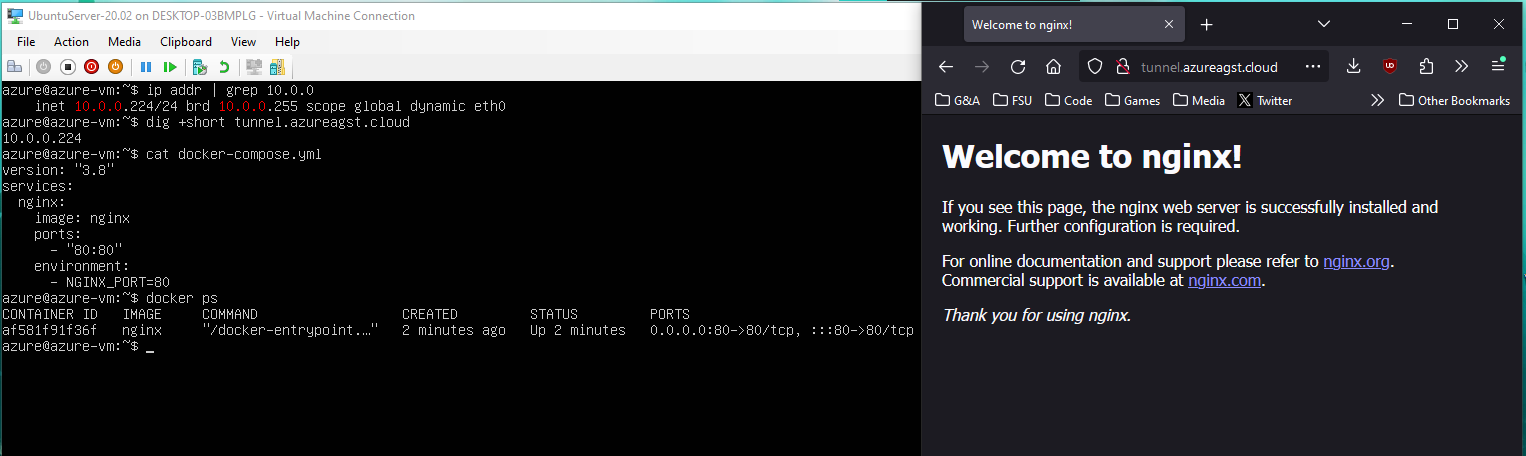
Now, we should follow all of the exact same steps as before to create a tunnel, but once we get to the step where we're supposed to run commands on the server, stop. We'll need to modify our docker-compose file to use the cloudflared image and docker's internal network, rather than the host network.
Update your docker compose file to use the cloudflared image, and be sure to include the access token from your copied command as an environment variable called TUNNEL_TOKEN. It should look something like this:
version: "3.8"
services:
nginx:
image: nginx
environment:
- NGINX_PORT=80
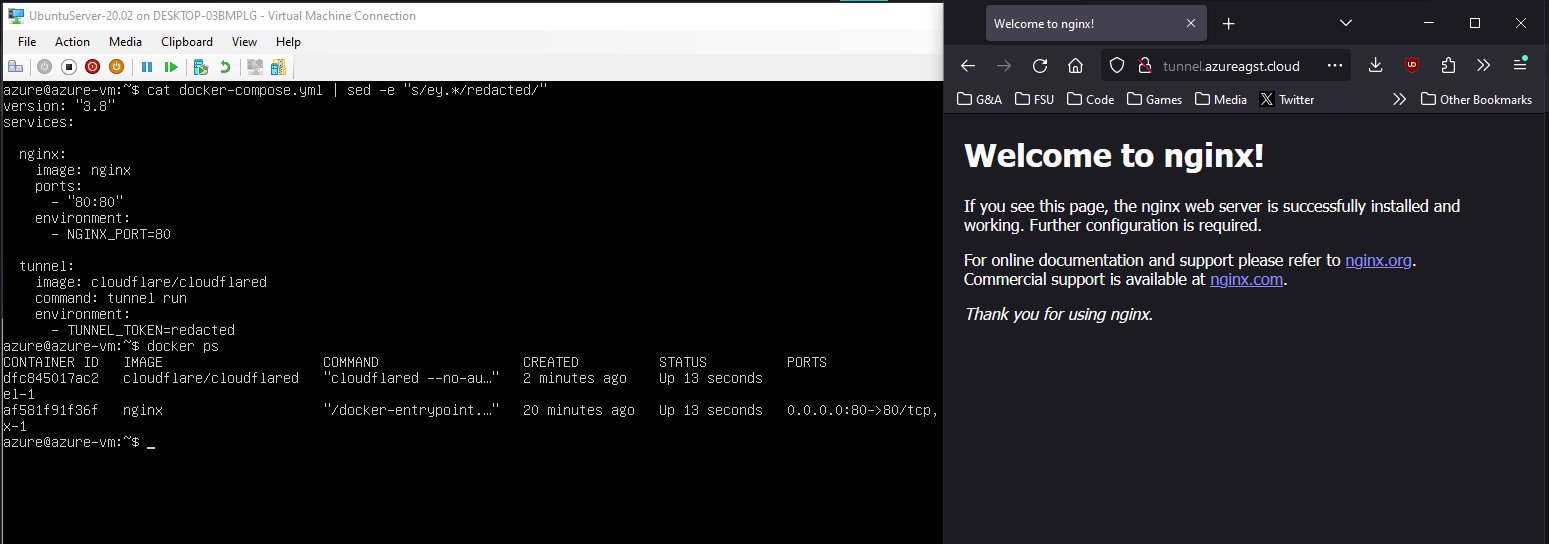
tunnel:
image: cloudflare/cloudflared
command: tunnel run
environment:
- TUNNEL_TOKEN=eyJhIjoiM...Go ahead and start your Docker containers back up, and you should see that the connector is live on the Cloudflare website, just like last time.
Now, when we get to the part on the website where we're supposed to specify our routing rules for the internal network, use the Nginx image name as the address. This works due to a special feature in Docker Compose's networking, which allows for you to connect to another container in a network by using the container's name as its hostname. You can read more about this here.
Now, if we finalize our changes and visit our website again, we can see that it's live!
Wrapping things up
In summary, tunneling is an awesome way to be able to still serve HTTP/HTTPS content without having to pay for an expensive static IP. This blog has been using Cloudflare tunnels for a long while now, and I've loved the experience. If you're a homelabber or tinkerer looking to host a new service for cheap, seriously consider giving tunnels a try.
It's also worth mentioning that you now also have access to all of Cloudflare's tools, such as DDoS protection, caching, Zero Trust, and more. It's worth poking around for a bit to see how their tools can help you deliver content!
Anyways, I'm tired. This post took several more hours to write than it should have. I'm gonna go shower then eat some soup. I'll see you all in the next post. :)
Update - Feb 15, 2024
Alright, I've done some more experimentation and I feel like I should add some more context, mostly about my experience configuring tunnels for this website, now hosted on AWS.
First, removing an Elastic IP from an instance in AWS doesn't remove its public IPv4 address altogether. Rather, it then gets auto-assigned a new address from Amazon's pool and keeps chugging along, so you still have to pay the fee. You can remove the public IP by having more than one network interface on the device when you disassociate the elastic IP from it, but then the instance has no networking at all.
Despite the existence of private IPs, Amazon doesn't NAT by default. To do so, you have to pay for a NAT Gateway, which is much more expensive than what we're trying to save by not using IPv4. This means that without a public IPv4 address at all, the device is totally offline, unless we network through some alternative means. So, this leaves us with no real choice but to do some IPv6 networking. Yippee.
I configured my VPC to use IPv6 by following this guide. After assigning my instance an IPv6 address, and updating my security groups to support IPv6 traffic, we were off to the races. Sort-of.
See, when I added IPv6 to the instance and then took IPv4 offline, cloudflared still complained because it uses IPv4 by default and has to be explicitly told to use IPv6 to connect. So, I also had to modify the services file using systemctl edit cloudflared:
[Service]
# We use this line to reset the ExecStart array, so we override vs. append
ExecStart=
# This is the same command from the original service, but with ipv6 specified
ExecStart=/usr/bin/cloudflared --edge-ip-version 6 --no-autoupdate tunnel run --token eyJhIjoiM...
After restarting the service several times and checking the logs in journalctl to see if the IPv6 tunnel was working properly, I once again took the elastic IP offline and was still able to access this website! Awesome!
The main upside to hosting this way versus just directly putting your instance's address in a AAAA record is that Cloudflare's network can act as an intermediary between IPv6 and IPv4 networks, so pretty much everyone can access it.
Only downside now is that I can't SSH into the server anymore from my IPv4 network. I can use Amazon's web-based serial terminal to do some basic editing, but it still sucks compared to SSH. Maybe this is the kick in my ass to finally configure my network for IPv6. Who knows?
Anyways, I'm out! Have a good one.
Another Update - Feb 16, 2024
So after contacting my ISP today, I found out that I don't have access to IPv6 infrastructure upstream, so using IPv6 to connect to my server directly is out of the question. Part of me is sighing a breath of relief, as that spares me the weeks of learning and configuring IPv6 for now, but I'm also slightly ticked that I don't even have that option if I wanted to.
I looked (briefly) into using Teredo or a proxy server to allow my network to talk to my server, but before I got too invested, I remembered that Cloudflare Zero Trust also supports tunneling TCP traffic over a VPN. Considering I already had a tunnel up and running, I figured this was the best plan of action.
I installed Cloudflare's WARP client onto my phone to use as a test device. Once it was set up, I logged back into the Cloudflare Zero Trust dashboard and configured my tunnel to route an additional private network, with my server's private IP being the only accessible address.
Afterwards, I had to go to my WARP client settings and remove Amazon's 172.16.0.0/12 subnet from the tunnel routing exclusions. After this, I was able to SSH into the server on my phone using the private key and its private IP!
Still troubleshooting lots of other networking issues, but cruising for now. I might upgrade the server to use the WARP client instead of cloudflared, since any IPv4 requests to say, S3 or the update server, are failing. But at the bare minimum, everything hosting-wise works at the moment, so no real stress.
Will update when everything is A-OK, but I imagine there's gonna be a lot of Cloudflare config updates in the near future.
Final Update - Feb 19, 2024
I've published a sequel to this post, which is linked below. I've also removed some information from this post that I've found to be factually incorrect.
 Andrew Augustine