Recovering a Botched Daybreak Update
Earlier today, I royally fucked up an update on my Nintendo Switch’s emuNAND. Here’s how I fixed it.

Earlier today I made a big mistake on my Switch which caused me several hours of pain. My mistake? Installing the FAT32 variant of the Nintendo Switch’s SD card drivers on my exFAT emuNAND.
I know, I know… Rookie mistake. While troubleshooting some wake-from-sleep delay issues I was encountering, a forum post I read suggested reinstalling a software update on my emuNAND. In the process of doing so, I forgot I upgraded to a 128GB exFAT SD a few months ago and installed the version without exFAT support. In my defense, I only touch my switch upon major game releases like PLA, so a lot of this was foreign to me. Regardless, my lack of caution left me with a large problem that still needed fixing.
This predicament was particularly tricky for one main reason. Had I botched my sysNAND, I could have just popped another FAT32 SD card in there with the right drivers, re-update to the exFAT variant, and been fine. But because my emuNAND was on the exFAT SD card— which now would not mount properly— I had one of two choices. Either I give up and restart my emuNAND using FAT32 or go down swinging.
As you can probably tell, I chose the latter. Here’s how I fixed it.
0.) Preparation
Here’s all the software that you’ll need:
- exfat-recover.bat
- hactool
- BinCmp
- NxNandManager
- HacDiskMount also works, but I prefer NMM
- Hekate, if you aren't using it already
- A recent copy of
prod.keys- If you don't have them, use LockPickRCM
- Any XCI containing a recent update payload.
- My emuNAND was 13.1.0, and PLA shipped with 13.0.0. Good enough.
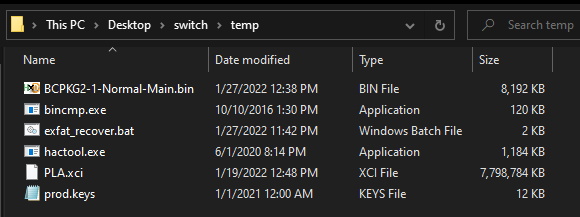
Make a temp folder on your desktop somewhere, and put exfat-recover.bat, hactool.exe, bincmp.exe, prod.keys, and your XCI in there.
1.) Dump BCPKG2-1-Normal-Main
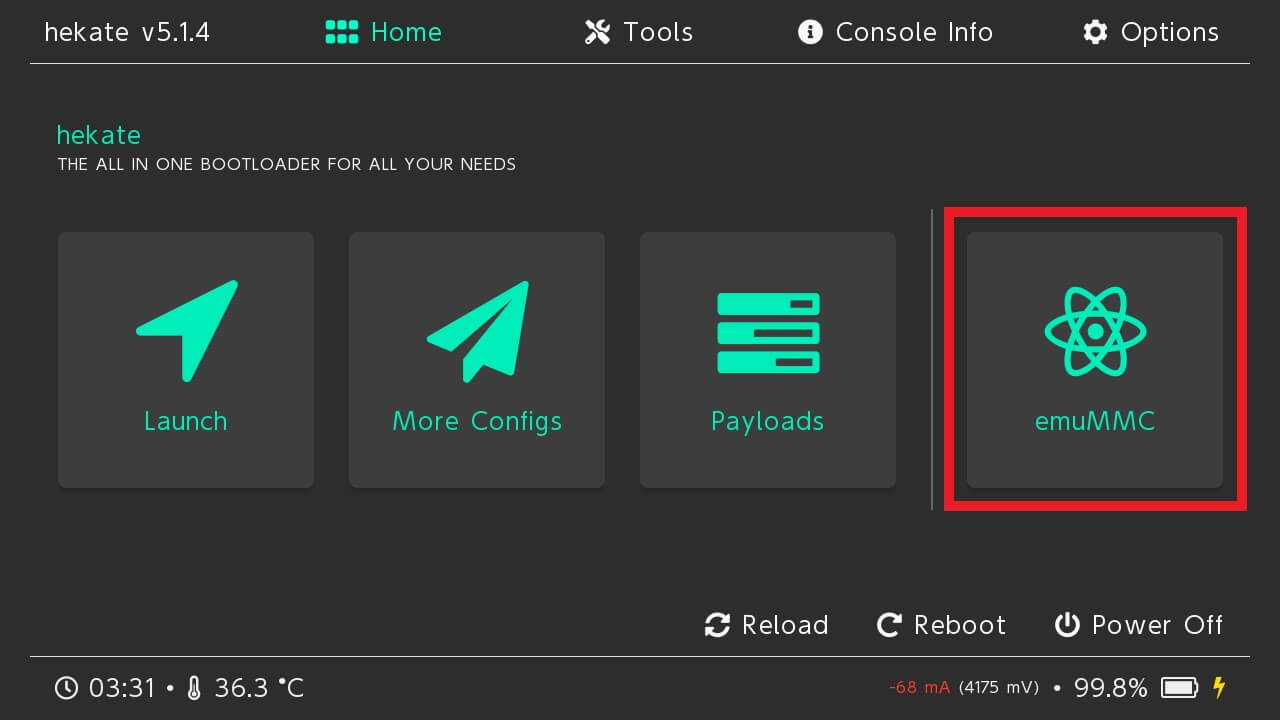
- Plug your switch into your PC and launch Hekate via your payload launcher of choice.
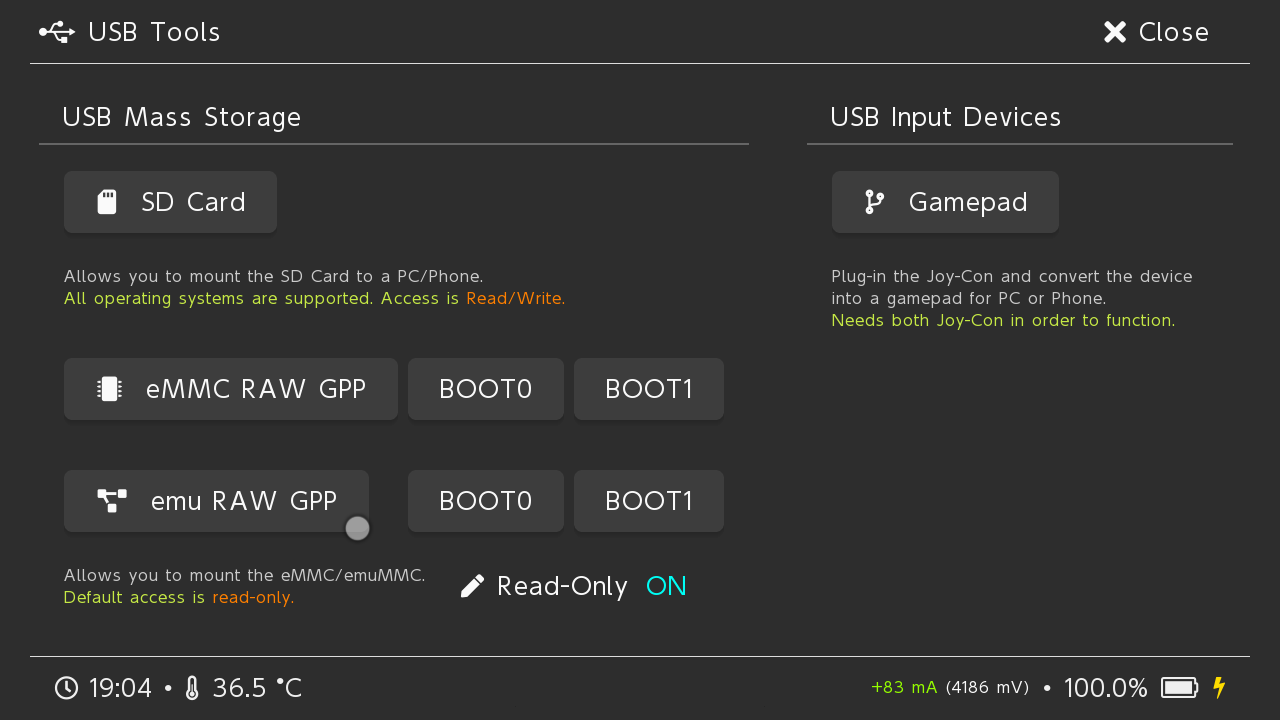
- Navigate to the "Tools" tab, the "eMMC/SD Partitions/USB" page, then finally "USB Tools".
- Ensure that the "Read Only" button at the bottom is set to ON, then tap
emu RAW GPP.- We'll keep this on for now and disable it only when we plan on writing, for paranoia's sake.
- Open NxNandManager with administrative privileges.
- Then in the toolbar click on "File", then "Open Drive".
- Finally, double-click "SD GPP Hekate".
- It'll take a second to load, be patient.
- Select "BCPKG2-1-Normal-Main" in the list, then click the first save icon to dump the partition to a bin file. Save this file to your temp folder.
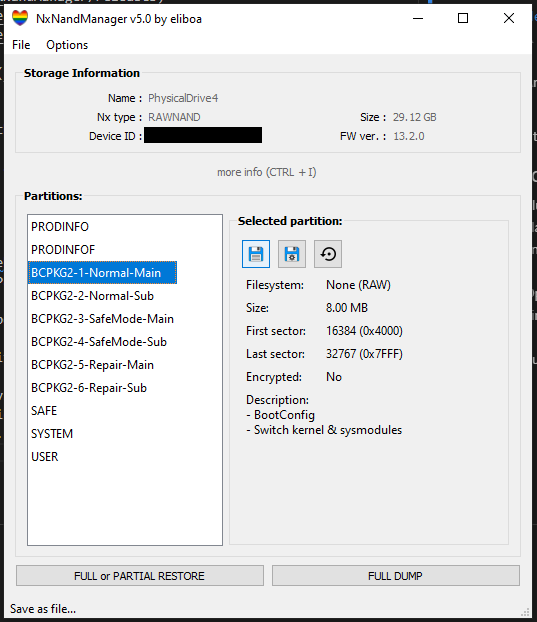
- Once done, unmount your switch using the “Close file/drive” option in the “File” toolbar menu.
2.) Modify Package2
- Confirm that your temp folder has all 6 required files:
exfat-recover.bat,hactool.exe,bincmp.exe,BCPKG2-1-Normal-Main.bin,prod.keys, and your XCI of choice
- Once ready, drag the XCI on top of
exfat-recover.batin the folder, and release.- If running via CMD, just make sure argument 1 is the path to your XCI
- Wait until the script is done!
- You now have a modified BCPKG2-1-Normal-Main with the exFAT drivers installed.
3.) Restore Modified BCPKG2-1-Normal-Main
- Follow steps 1-4 of section 1 to once again mount your emuNAND on your PC
- IMPORTANT: Make sure this time that "Read Only" is OFF, as this time we'll be writing to the emuNAND
- Select "BCPKG2-1-Normal-Main" in the list, then use the "Restore from file" option to load your modified Package2 onto your emuNAND.
- Once done, unmount your switch using the "Close file/drive" option in the "File" toolbar menu.
- You can now unplug your switch and try rebooting into emuNAND!
- If rebooting fails, use this section's steps to restore to an earlier state using the
BCPKG2-1-Normal-Main.bin.bakfile that our batch script made.
- If rebooting fails, use this section's steps to restore to an earlier state using the
4.) Wrapping Up/Damage Control
- I wouldn't trust this bodge of a job, so as soon as you boot into emuNAND and get to home screen, open up daybreak.
- Properly update this time, taking EXTREME CAUTION to make sure you pick the exFAT install option this time.
- Finish the update, then reboot into emuNAND once more.
- Finally, enjoy a sigh of relief and pat yourself on the back because you just recovered your emuNAND!