A Doubter's Guide to Docker
I’ve been a doubter of Docker for years now. However, after finally getting it to work for a class project, I’m finally starting to turn the corner.


Unless you’ve been living under a rock for the last decade, if you’re in the world of software dev, you’ve almost assuredly heard the terms “Docker”, “Kubernetes”, or “Containers” before. For some of you, it’s probably an enticing thought; a new technology, waiting to be discovered. For me on the other hand, it was the bane of my software dev existence for the longest time.
Unlike most serious devs who use UNIX environments as their daily driver, I have other “obligations” that prevent me from doing so. This means that I have to use WSL to run my Docker environment, which until recently, was a buggy burning garbage fire due to an unstable WSL 2 backend. The first time I tried installing Docker 6 months ago, it royally screwed the networking on my Ubuntu WSL install, which prompted me to create this blog post. Upon realizing Ubuntu was genuinely broken, I uninstalled Docker and spent the rest of that afternoon fixing what it had broken.
Fast-forward half a year, and now I’m required by— not just one— but two of my classes to containerize my team’s projects. Luckily now Docker (w/ WSL2) is in a stable enough state that it didn’t mess up my Ubuntu install this time, and I could actually get it up and running. In fact, everything was pretty smooth from here on out. It only took me 6 hours to get a deep enough understanding where I was able to totally revamp one of my projects’ GitHub Actions workflows to use Docker as a backend.
Now that I’ve seen what it’s capable of, I’m hooked. I will admit that it’s a pretty steep learning curve though, so out of both a feeling of guilt for not posting here in a few months, and an interest of having some notes to look back onto, I decided to make this new blog post for everyone to enjoy. :)
So what is Docker?
If you’re a new user, interested in what Docker is, and you decide to visit the Docker Website in search of answers, you will almost instantly be flooded with buzzwords that would bore pretty much anyone other than a project manager or executive. As such, I’ll give you my own definition:
Docker is a way of packaging code and applications into standalone images, which can be shared with other people via container registries like index.docker.io or ghcr.io, and then spun up by anyone within seconds by using Docker’s fast, virtualized, and isolated container system.
I’m sure there’s more to it than that, but generally that’s the gist of how it works. So long are the days of shipping install instructions with your git repo and constantly being on-call for when the people doing on-prem installations inevitably have questions! Now you can just share a single container of your code, give people a one-liner command to get it working, and kick back. Pretty sweet!
Before we go any further, there are a few definitions I’d like to make clear:
- Image: More formally known as an App Container Image, this is a “compiled” version of your repository, ready for sharing with other people.
- Container: Similar to a VM, but not really. Containers are much more lightweight than VMs, and many containers can run beside each other in a single virtual/physical machine without interacting with each other.
- Container Registry: Collections of servers where users are allowed to upload their Images and share them with other people. By default, everyone uses the Docker Container Registry (index.docker.io) to share images, but because Docker allows for use of third party registries, many leading tech companies host their own registries.1
- GitHub (ghcr.io)
- Google Cloud (gcr.io)
- Amazon Web Services (ecr.*.amazonaws.com)
- Microsoft Azure (*.azurecr.io)
Still skeptical that containers are really that much better than VMs? I’ll let this chart do more of the talking for me:
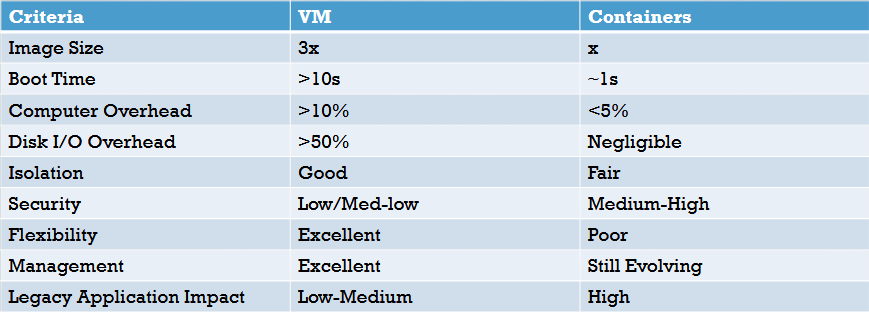
In almost every performance metric, containers are superior to VMs. They’re quicker to start, have a smaller footprint, and boot extremely fast. However, that’s not to say they don’t have their issues. Flexibility is poor due to their “compiled” nature, and management can be very daunting and complex at first. That said, if you’re willing put these issues aside, containerizing can be a very smart and efficient way of distributing projects.
Quick Aside: K8s
Docker by itself is a very powerful tool when it comes to learning how containers work and experimenting with them, but there are many other powerful tools that use containers. Remember when I mentioned Kubernetes at the start of this post? Kubernetes (aka K8s) is just a way of taking containerized applications, made using tools like Docker, and getting them to run on clusters of computers, rather than a single VM. K8s handles load balancing, networking, and everything in between; all you need to do is configure the cluster and tell it what containers to run. It’s a really powerful tool that makes distributed computing a breeze.
But before we can run, we must learn how to walk. So let’s talk about how to actually use Docker.
Installing and Running Docker
You can install Docker from their website, specifically this link. Your installation experience will be different depending on your host operating system and architecture. For me personally, I use Windows with WSL2, so I’d follow the Windows instructions on that page.
Important note for my WSL2 users: If you’re used to using your distro’s shell for almost everything, I’ve got great news! You don’t have to use PowerShell to run all of your docker commands. Docker for Windows exposes the docker command suite inside your WSL installs if you flick a hidden switch in the desktop app. Be sure to launch Docker Desktop and flick on your desired distros under Settings -> Resources -> WSL Integration.
Once you’re installed, I heavily recommend allocating an hour’s worth of time and doing the getting started tutorial. In case you dismissed that prompt while setting up Docker Engine, simply open a Bash/Zsh or PowerShell instance and run the following:
$ docker run -d -p 80:80 docker/getting-started
Then, open up a browser to localhost and you should see the website!
In case you’re curious, the command above does the following:
docker runtells the docker engine to run a container-dtells docker to run in detached mode; i.e. run the container in the background-p 80:80tells docker to expose the container’s port80on the host’s port80docker/getting-startedis the name of the image you’d like to download and run
This tutorial gave me a LOT of insight into how these containers work, and I recommend every new user see it through, even if the HTML doesn’t render properly all the time. ;)
Containerizing Our App
The next few sections are going to revolve around the hypothetical situation that we have a repository that we wish to publish. I could teach you how to use the Docker Registry, but Docker’s Getting Started tutorial already tells you how to do that, so instead I’ll show you how to publish to a different registry: The GitHub Container Registry.
0.) Premise / Setup
To begin, fork my example repository, located at Azure-Agst/dockertest, to your account.
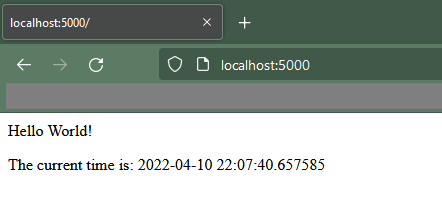
This repository contains a super simple Flask app that spins up a web server on port 5000, which says “Hello World!” and the current time. It also has the file structure in there for testing via pytest, although we won’t be messing with that today.
Clone your fork to your local machine, if you haven’t already. You can spin the website up by creating a file called .flaskenv in the root, and giving it the following contents:
FLASK_APP=flaskapp
FLASK_ENV=development
Then, make a Python virtual environment, source it, install requirements, and finally flask run to get it working. Here’s what it looks like:
1.) Write the Dockerfile
Let’s start by containerizing our current repository and packing it into an image. We do this using a special file, called a Dockerfile. A Dockerfile is a text-based set of instructions which tells the Docker Engine how to compile our project into an image.
In the base of the repository, make a Dockerfile and give it the following contents:
FROM python:3
WORKDIR /usr/src/app
COPY requirements.txt ./
RUN pip install --no-cache-dir -r requirements.txt
COPY . .
CMD [ "flask", "run", "--host", "0.0.0.0" ]
This is probably a bunch of jargon to any newcomers, so let’s break down what this is doing:
FROM python:3- This command tells Docker to base our image off of the preexisting Python3 image from the Docker Registry.
- The
python:3image contains a lightweight Debian Bullseye install with the standard Python suite on it.- The text after the colon is called the tag, and typically images will have multiple tags to delineate between versions; in this case Python 2 and 3.
- There are also some tags that append additional info, like the kernel you'd like to use.
- For example,
python:3.11.0a7-alpine3.14is a version of the Python image that comes with Python 3.11.0 and is based off of the Alpine Linux 3.14 base image.
- For example,
- See the image's docs for a list of tags they support. In this case, here's the Python image's documentation.
WORKDIR /usr/src/app- This tells Docker that for the rest of the script, we'll be working within the image's
/usr/src/appdirectory. - Realistically, this folder could be any location, but recall that the
python:3image is based off Debian Bullseye. - We don't want to overwrite any mission-critical files, like OS files, so pick an empty space that is safe to use.
- Docker will make the directory if it doesn't exist in the base image already.
- This tells Docker that for the rest of the script, we'll be working within the image's
COPY requirements.txt ./- This copies in our requirements file to the image's working directory
RUN pip install --no-cache-dir -r requirements.txt- This runs
pip installin the image's working directory, which installs our project's dependencies onto the image.
- This runs
COPY . .- This copies the rest of the project into the image, bar any files specified in our project's
.dockerignore, which we don't have set up yet. - For a quick bodge, just copy the contents of our
.gitignoreto.dockerignore. If you want to block it on Git, you probably want to block it here too, with a few exceptions.
- This copies the rest of the project into the image, bar any files specified in our project's
CMD [ "flask", "run", "--host", "0.0.0.0" ]- This sets the default command to run when the image is started.
Now that your Dockerfile is made, go ahead and use it to compile your image using the following command:
$ docker build -t dockertest .
This builds an image called dockertest from the contents of this directory. You should see a bunch of text pop op on the screen, inside which you should see the instructions we defined within the Dockerfile! Once the build is done, you should be able to run your newly created image:
$ docker run -dp 5000:5000 dockertest
You should now be able to connect to your web server at localhost:5000! Give it a shot!
To see your server running within docker, use the docker ps command:
$ docker ps
CONTAINER ID   IMAGE        COMMAND                  CREATED          STATUS          PORTS                    NAMES
189a4b57a683   dockertest   "flask run --host 0.…"   23 seconds ago   Up 23 seconds   0.0.0.0:5000->5000/tcp   sad_panini
Once you’re done, you’ll need to stop the container: (Note that your container ID may be different!)
$ docker rm -f 189a4b57a683
Another Quick Aside: Layer Caching
Now, the keen eyed amongst you might be asking yourselves the following: “Why are there two copy commands? Why not just copy in the entire project and then install dependencies?” Good question! This is where the topic of layer caching comes into play.
Images, like onions, are made up of layers, which you can see by running docker image history [image-name] on any image. Every time a command within a Dockerfile is run, it creates a new “layer” on top of the result of the previous step. Docker is able to cache and reuse these layers to speed up build time later, but cached layers will only be used if all of its parents are unmodified. If that doesn’t make sense, I’ll repeat using the official language from the Docker tutorial:
Once a layer changes, all downstream layers have to be recreated as well
For all intents and purposes, our project’s dependencies don’t change that often. If they remain static, then ideally we should only need to re-fetch them when something changes, like a requirement version bump due to a vulnerability.
If we copy in the whole project in one go before installing, it means that every layer below our copy would need to be re-run every time we edit a file. Specifically it means that every time we rebuild, we’ll need to run pip install again, which is redundant! Even minor changes cause an entire reinstallation of requirements. While on small projects this isn’t that detrimental, on large projects this can be a royal pain. Writing Dockerfiles this way is just a waste of valuable build time, and generally frowned upon.
If we wanted to use layer caching to our advantage, we’d copy in the requirements file first, then install everything, and finally copy in the rest of the project. Unless we’ve modified our requirements file, layer caching should detect that no changes were made to our requirements, then use the cached layers to make the new image. Essentially, layer caching simplifies the build to only copying the newly modified files over the old ones, as we would expect.
Use image caching to your advantage, it’s worth it!
2.) Developing Alongside Docker
Having to rebuild every time you make a change is pretty annoying, even with layer caching. There has to be a better way to run our code in development, right?
You’d be right! Pretty much everything that can be written in your Dockerfile can also be specified on the command line, without having to re-build every time. Here’s what our command would look like:
$ docker run \
    -dp 5000:5000 \
    -w /usr/src/app \
    -v "$(pwd):/usr/src/app" \
    python:3 sh -c "pip install --no-cache-dir -r requirements.txt && flask run --host 0.0.0.0"
Here’s the breakdown:
-dp 5000:5000: Run detached and bind container’s5000to host’s5000-w /usr/src/app: Set working directory to/usr/src/app-v "$(pwd):/usr/src/app": Maps the host’s curdir to image’s/usr/src/apppython:3: Base our image off of thepython:3imagesh -c "...": The command to run once the image is booted
As you can see, most of the settings specified match up with what we defined in the Dockerfile. For example: -w is WORKDIR, the first positional argument is FROM, the following arguments parallel CMD.
Quick note: If you try running this, and you get an error that says something along the lines of Bind for 0.0.0.0:5000 failed: port is already allocated, it means that you didn’t shut down the container you spun up in Step 1. Either use the ps/rm -f commands or the desktop app to kill it. Then come back here and run this command again.
I’d like to bring special attention to the -v flag here. This flag is used to specify volume storage that our container can use, and in our case, the -v flag is used to do something called a “Bind Mount.” This is a perfect segue into the topic of persistence.
The Last Quick Aside: Persistence
Because Docker images are compiled, they are— for the most part— static. However, all containers are allocated a small amount of scratch space at runtime used to store files and data that the container may create while running. It’s not a special folder within the image or anything like that; essentially think that for any file created at runtime, regardless of its place in the file system, the data is actually stored on the scratch space “partition” of the container.
When the container shuts down, the scratch space is discarded with it, sending all generated files into the abyss, never to be seen again. If we want files to persist, we need to create some form of volume storage for the container to use, typically either a Container Volume or a Bind Mount:
- Container Volume
- A Container Volume is a block of storage created and managed by the Docker Engine, that is referenced to by its name.
- You can create a volume by running the
docker volume create [volume_name]command. - You can mount a volume to a mapping by using the
-vflag- i.e.
-v "db_vol:/etc/db"mounts the volume known asdb_volto/etc/dbwithin the container
- i.e.
- If the volume specified by
-vdoes not exist, it will be created for you. - Volumes persist between image runs, but the contents generally aren't visible/modifiable by the user.
- Bind Mount
- Bind Mounts are a way to mount part of the Source OS's file system to the container
- Typically this isn't used to persist data in production, but can be useful for development cases
- You can mount a folder to a mapping by also using the
-vflag- i.e.
-v "$(pwd):/app"mounts the output ofpwd(i.e. full path to current directory) to/appwithin the container
- i.e.
- The difference between a Volume and Bind Mount whether the string before the colon contains forward slashes or not.
Now Back To Your Regularly Scheduled Programming…
Running the command at the start of the section will create a Python container with your host’s current directory mounted as the container’s working directory, then pip install and run the server. Any changes that you make to your code on the host should be picked up by the flask run command within the container, and it should reload your web server automatically. Now you can develop within the container without having to worry about build times at all!
Once you’re done developing, you can recompile your volume using your usual docker build command. Now we’re about ready for distribution!
3.) Authenticate with GHCR
If you’ve followed Docker’s Getting Started tutorial, survey says that you’re logged in to Docker’s Registry, but not GitHub’s. Let’s change that.
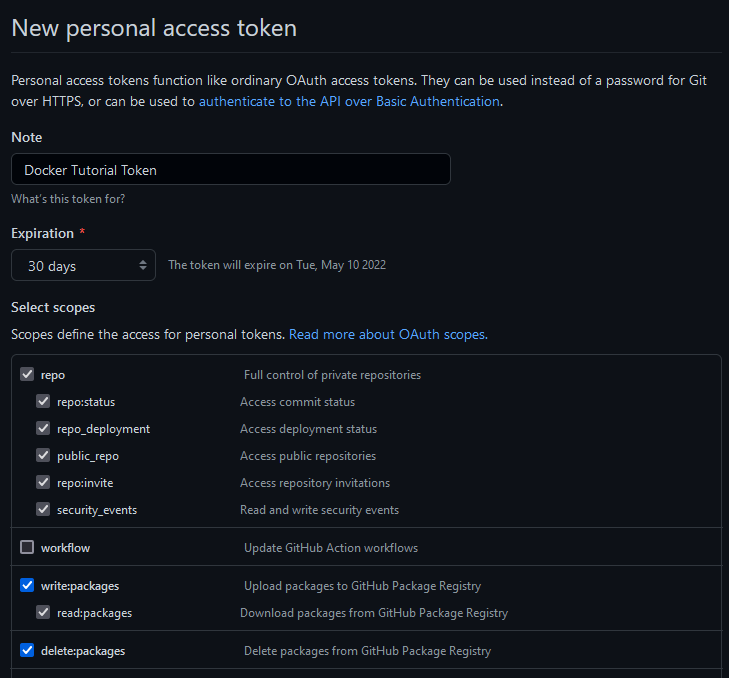
In order to log in to GHCR, you’ll need a Personal Access Token (PAT) with permissions to read/write/delete GHCR images on your account’s behalf. If you don’t have one, log into GitHub and go to your account’s settings. At the bottom of the nav sidebar, click on “Developer Settings”. Finally, click on “Personal access tokens” and you should be presented with this screen:
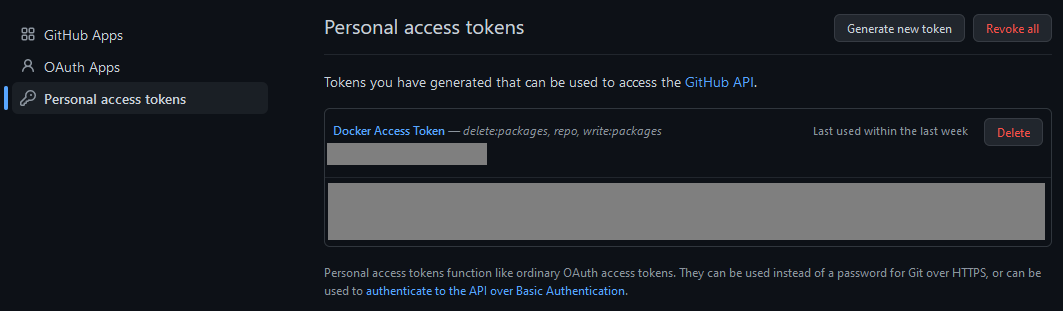
As you can see, I already have a token made for Docker with the delete:packages, repo, and write:packages permissions, but you may not. If you don’t, take the following steps to make a new token.
- Click on “Generate new token” in the upper left to make a new Token.
- Type in your password to enter “Sudo Mode” if you haven’t already.
- Name the token whatever you want, preferably something pertaining to Docker, so you can identify it later.
- Set the expiration to whatever you want, keeping in mind that longer expirations may lead to security vulnerabilities down the line.
- Click the
write:packagesanddelete:packagestickboxes and that should automatically click a bunch of other boxes for you.
When all of this is said and done, your screen should look something like this:
Click the green “Generate Token” button at the bottom of the page, and you should be redirected back to your token list, and see the PAT there for you to copy:
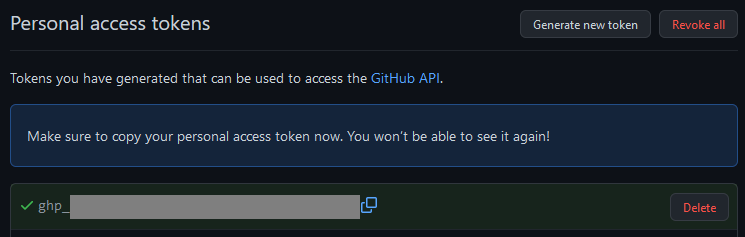
Save this PAT somewhere safe! Now, open up a shell and type the following command, replacing the string following the -u with your GitHub username:
$ docker login ghcr.io -u YourUsername
When prompted for your password, paste the PAT you just generated. If done properly, you should now see a “Login Succeeded” message pop up. This means we are now properly authenticated with GHCR and can use its services to read private packages we have access to, and publish to their servers as well!
4.) Uploading the Image
It’s about time to upload our image! We’re already logged in, so uploading should be a breeze. The push process will vary from registry to registry, so be sure to look at your registry’s docs on how to push. Once again, the Docker Getting Started docs are great reference for getting set up the Docker registry. Below will be the instructions for GHCR.
First off, we need to re-tag our image. Right now it’s just called dockertest, which is fine for local runs, but we need to make it match GitHub’s spec to have them accept our upload. Specifically, GHCR requires image tags to be of the format ghcr.io/[all_lower_user]/[imagename]. To re-tag our image, we can either rebuild the image using the new tag we want, or rename the existing image:
# 1.) Either recompile with new tag...
$ docker build -t ghcr.io/yourusername/dockertest .

# 2.) ...or retag an existing image!
$ docker tag dockertest ghcr.io/yourusername/dockertest
We’re ready. It’s time to push. Use the following command to push your image upstream:
$ docker push ghcr.io/yourusername/dockertest
Using default tag: latest
The push refers to repository [ghcr.io/yourusername/dockertest]
4ba372f90b76: Pushed
25af8241bb6e: Pushed
f10144bdd533: Pushed
...
4ac8bc2cd0be: Pushed
latest: digest: sha256:... size: 3054
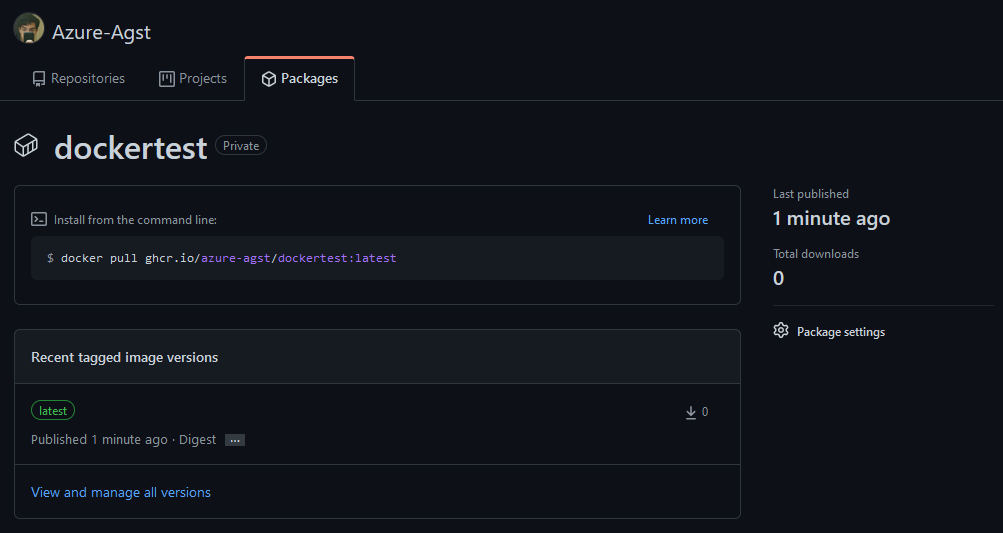
Now, if you navigate to your GitHub profile and click on the Packages tab, you’ll see your image there!
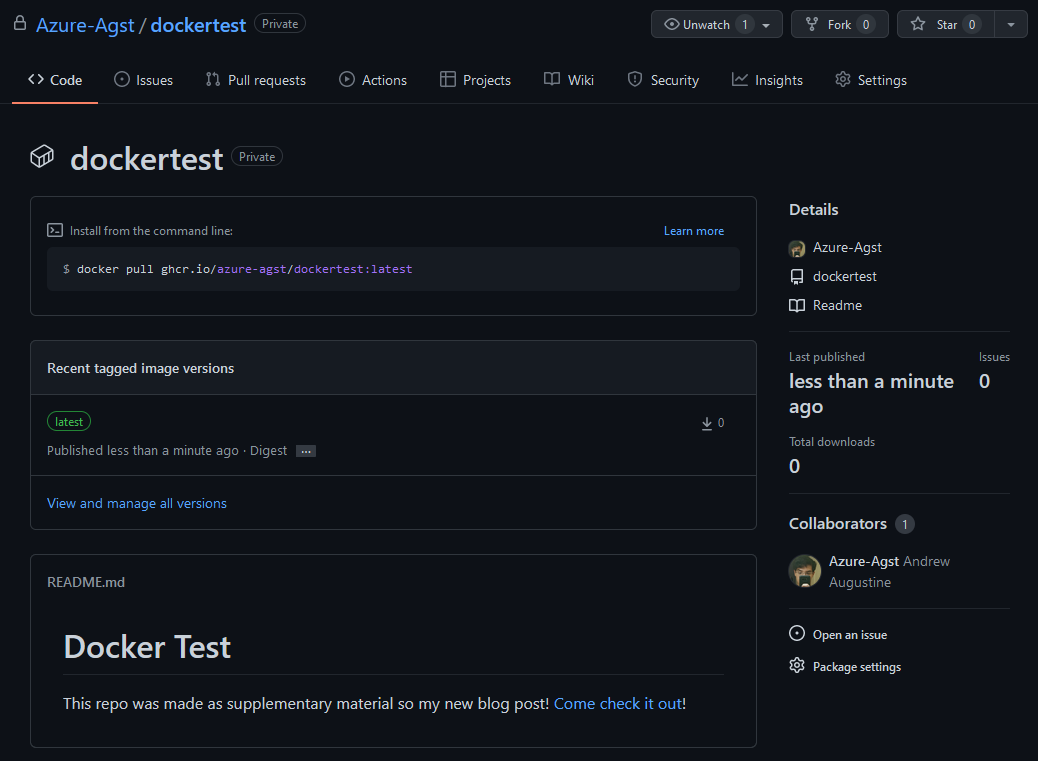
But wait! Our repo information isn’t there! That’s because we haven’t added the labels to our image within our Dockerfile that allow our package to point to our repo. Go back to your Dockerfile and add the following line right after the FROM line, making sure to replace yourusername with your GitHub username:
...
LABEL org.opencontainers.image.source="https://github.com/yourusername/dockertest"
...
Rebuild and push again, and now you should see your repository has been linked to your container!
One last step: all images pushed to GHCR are marked as private by default. To change this, go into the package settings on the lower right, scroll to the bottom, and change the visibility!
Congratulations! Your container is now publicly published for everyone to view and use!
5.) Testing the Image
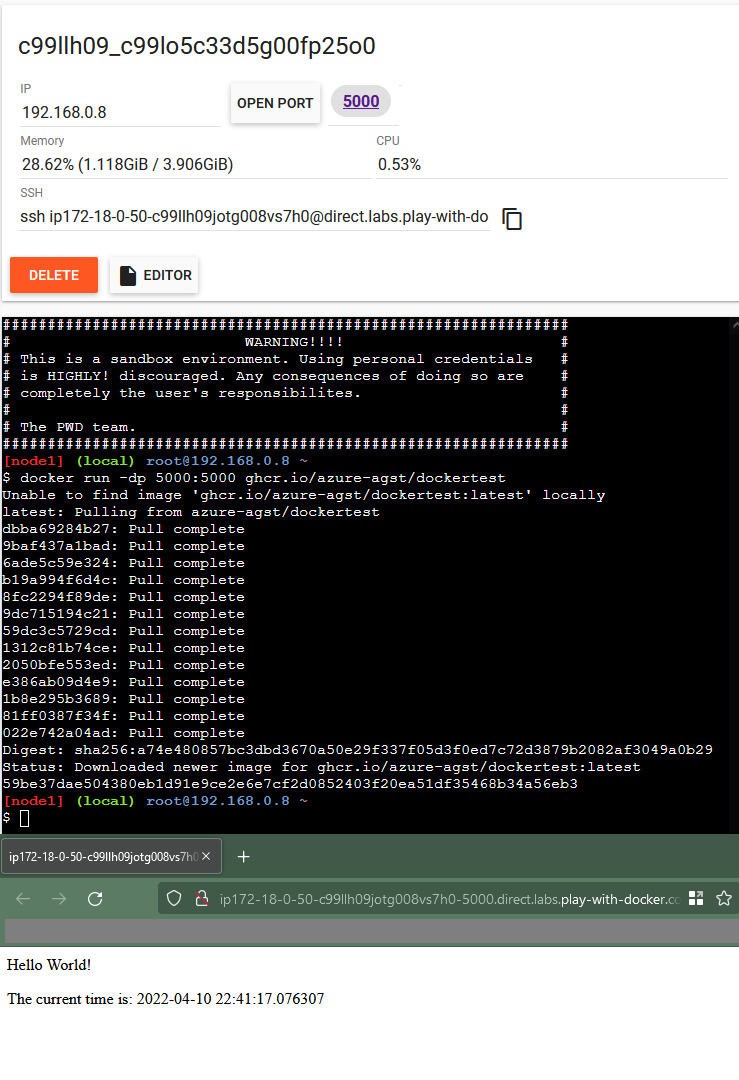
Now, let’s test to see if the image works on another machine.
Start by visiting the Play With Docker website, and log in using your Docker Hub credentials. (If you don’t have an account yet, I suggest you make one!)
When loaded in, spin up a new instance by clicking on the “+ Add New Instance” button in the sidebar. In just a few seconds, you should have a fully working docker playground at your fingertips!
Let’s try deploying our new image. In the terminal on the right side of the screen, type the following command:
$ docker run -dp 5000:5000 ghcr.io/yourusername/dockertest
This should download the image from GHCR (without any need for auth, since the image is public) and launch it on the test machine. After the image is done downloading and extracting, you should see the number “5000” pop up towards the top of the window, right next to the “open port” button. Click on it, and you should see our website!
Onwards From Here!
Congrats! You’re now initiated in the ways of Docker! Hopefully you can see that it’s a really powerful tool; I definitely plan on integrating it into my workflow more. From here on forwards, our knowledge of the technology only gets greater. If you want to keep learning, here are a few more challenges to keep you going:
- Do the Docker Getting Started tutorial, if you haven’t yet already.
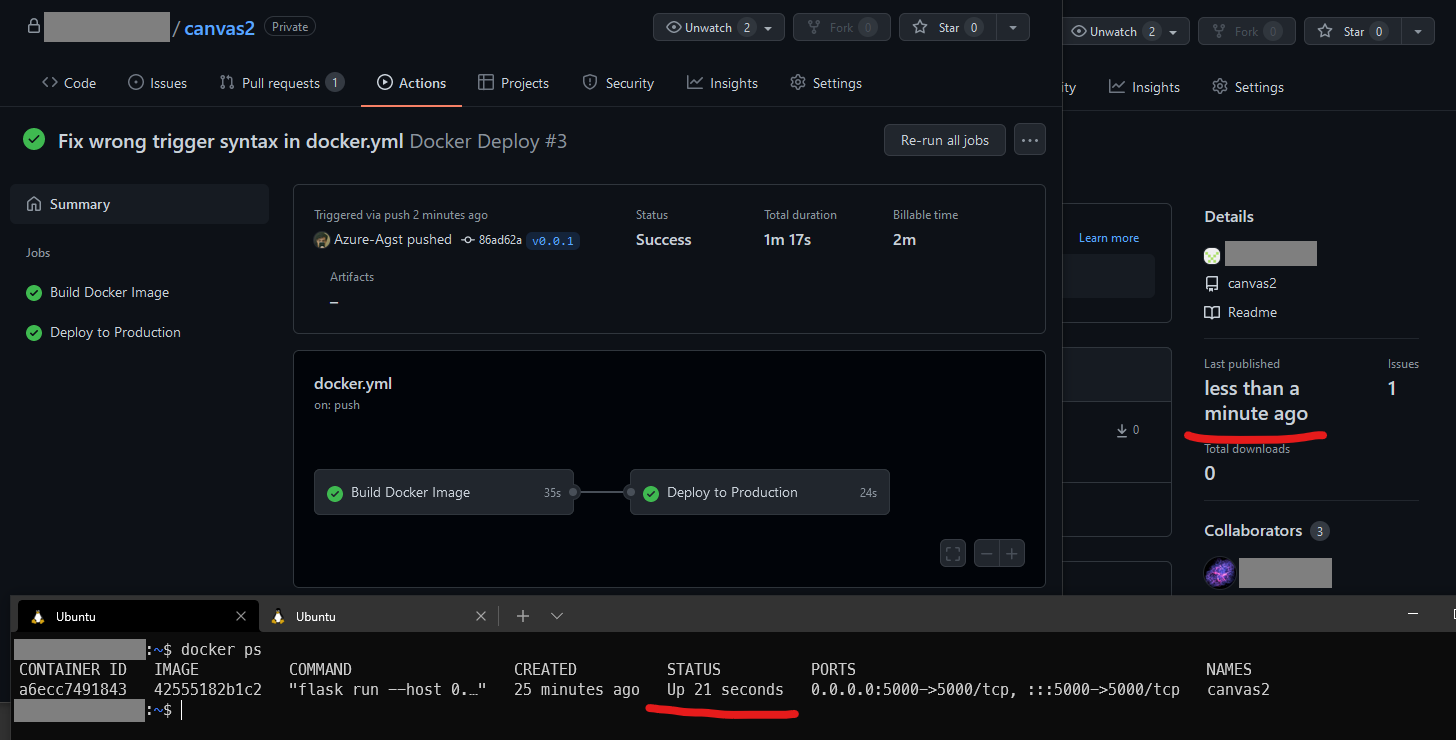
- Try to use Docker and GitHub Actions to set up an automation that builds a new image upon a push to main.
- Experiment with the desktop app, to see how its built-in tools can be more intuitive than the CLI.
- Convert a project you already have into a containerized version, if you can!
That’s all I have for now! This post took a while to make, but was really fun! I hope you learned something, and that it makes up for my extended absence. See you all in the next one!
- Docker is actually one of many companies in the Open Container Initiative (OCI), which is a collaboration of many industry leaders to create a standard for containerized applications. Using the phrase “allow […] third party registries” here is probably incorrect, as Docker’s registry is just one of many that follow OCI standards. ↩